The idea behind district heating is that multiple buildings can be heated using shared heat sources when connected together with heat-supply piping and proper central controls. All the buildings in a given location (or district) are interconnected to receive heat from the same heat sources. A district heating system can be large, including many buildings, such as a small town or a college campus. But it can also be a smaller collection of buildings, clustered together to share the same heat source such as a group of institutional buildings or ranch buildings for example. The very smallest possible micro district is, of course, two buildings that are close enough to each other to share the same heat source using buried/insulated heat supply and return tubing.
This kind of plumbing interconnection and its control can easily be accomplished using the same hydronic heating methods discussed regularly in this column. In fact, we have often used the new standard hydronic plumbing configuration in small district heating installations without any alteration to the basic primary loop’configuration or the standard control system. Here are some examples of how that works.
The typical standardized piping configuration
In Figure 74-1, you can see a schematic piping diagram using the new standard piping configuration that we have used in virtually every solar/hydronic combisystem designed in our office over the past decade or so. This diagram shows a typical new standard primary loop installation in a small house that requires only four secondary loops. Only the most basic elements of a solar combisystem are needed: (1) Solar Heat, (2) Hot Water Boiler, (3) Domestic Hot Water (DHW), and (4) Radiant Masonry Warm Floors. This diagram is modeled after dozens of successful heating installations just like this, installed over the past few years.
Notice that the heating equipment is organized around the primary loop in a consistent temperature order. The heat sources are mounted so that lower temperature sources come before higher temperature ones. So, for example, solar heat can either provide pre-heat to the boiler, or bypass the boiler. The heat loads are connected so that the higher temperature requirements come before the lower temperature ones (e.g. Heat returning from the DHW is still hot enough to heat the floors.) It is important to design these systems with the correct temperature order around the primary loop for best performance and highest thermal efficiency.
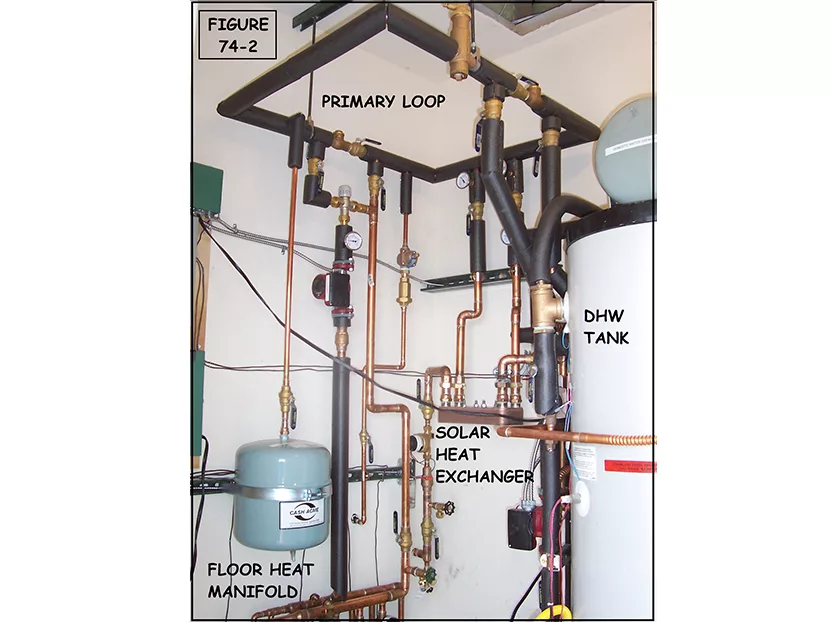
This minimal hydronic combisystem is also known as Combi 101, and the photograph in Figure 74-2 shows how a similar installation looks when assembled in a relatively small space. The primary loop in this typical residential installation is mounted near the ceiling of the mechanical room, and this is recommended whenever possible.
Perhaps the most important design feature of this configuration is that any additional heat sources or heat loads can be included or excluded from the design simply by plugging or unplugging a secondary loop with two pipes (two closely spaced tees). In other words, it is easily expandable, allowing more heat sources and more heat loads to be included simply by adding more closely spaced tees around the primary loop. Also, the pipe connections between two component parts can be extended, or stretched if you will. So, two components that are 5 feet apart in one installation might be 50 feet apart in another installation, but function exactly the same way with the same controls in both cases. This easy adaptability comes in handy when dealing with small district heating applications.
Extending the primary loop
The headquarters of the Mid-West Renewable Energy Association (MREA) provides a good example of an installation where two buildings at the Visitor Center are connected by one heating system. Figure 74-3 shows a block diagram of how the hydronic heating equipment is distributed between two buildings, connected by a primary loop that is extended 50 feet underground.
Each building (outlined in green) has a substantial bank of solar heat collectors on its roof. The north building uses a drainback system while the south building has evacuated tube collectors using pressurized glycol. The other heat sources (outlined in red) are in the north building and include a wood gasification boiler with a large heat storage water tank system and a conventional hot water boiler. The heat loads (outlined in blue) include a DHW tank and two space heating manifolds south, and one space heating manifold north.
Notice that we designed the primary loop connections to maintain the proper temperature order, as best we could despite the physical separation between buildings. Manifold A, however, is not in the proper temperature order in the north building because it is surrounded by heat-source equipment. Ideally it should be connected next to Manifold B for best thermal control, which was not possible here. But since all the other components are in the proper order, the system performance has been very good despite this small design deviation.
Extending the secondary loops
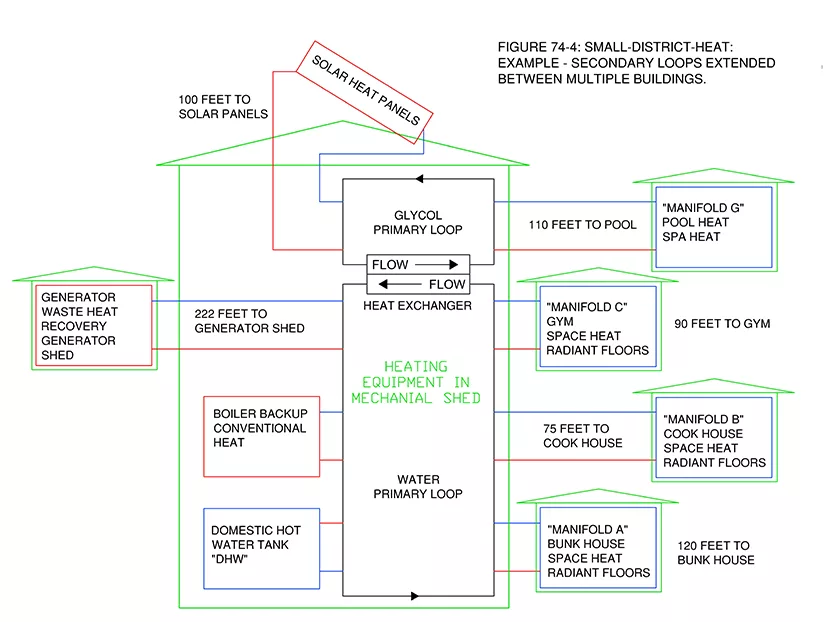
The block-diagram in Figure 74-4 shows an example of how secondary supply and return pipes can be extended from a central mechanical room to supply heat to multiple small buildings. This was designed for a group of small buildings at a Guest Ranch in Texas where the dual primary loop was kept inside a central mechanical shed, and the secondary loops were extended (buried in utility trenches) to the remote buildings nearby. (Several manufacturers make pre-insulated PEX tubing in a weatherproof conduit that makes the insulation and burial as painless as possible, such as Rhinoflex or Uponor’s Ecoflex products.)
In this heating system, we use the same basic dual primary loop configuration used in the Combi 101 system in Figure 74-1, but with more of everything. There are more heat sources: solar, boiler and engine generator waste heat recovery. There are more heating loads: a central DHW tank, multiple radiant floor heat zones in several different buildings and pool and spa heat.
Again, notice that the temperature order of all the secondary loops is consistent with good thermal control. The intermittent heat sources (the solar and generator heat) are connected before the boiler so that if they produce useful heat at a lower temperature it can be used to preheat the boiler (or bypass the boiler if temperatures are high). The heat loads are connected around the primary loop in descending temperature order: DHW is connected first after the boiler, then the radiant floors and then the pools.
The heat distribution tubing is spread out across a number of buildings, and because the pipe runs to the remote manifolds is longer, the circulator pumps and the tubing diameter was upsized when necessary. The basic plumbing configuration, however, is identical to any other new standard dual primary loop and so the control functions are identical as well.
Total system control
The proper control of a heating system like the ones seen above require more than just turning the solar collectors on and off at the right time. Optimization of energy efficiency must be in proper balance with the target-temperatures needed for each heating load and requires total central control of all the components in the heating system.
At SolarLogic, we have created a control system known at the SLIC (SolarLogic Integrated Control) that provides total control specifically for this type of new standard piping configuration. The comprehensive features built into the SLIC control system can be enabled or disabled in software to match the configuration of the final installation. That includes matching the temperatures available from the intermittent heat sources to the appropriate heating loads. Prioritizing the free heat over the conventional fuel. And, managing heat storage in the water tanks, pools and in the concrete floors to provide both energy efficiency and optimal comfort.
Summary
The hydronic combisystems seen above are examples of a new standard that includes both a plumbing configuration and a control scheme. When taken together, this comes very close to becoming a plug-and-play solution for solar/hydronic combisystems that requires very little customization from one system to the next.
The piping diagrams seen here are put together in a systematic configuration that allows the same basic design features to be applied easily in both large and small hydronic combisystems. Multiple heat sources and multiple heat loads of various temperatures can be combined to work together with a minimum of customization from one heating job to the next. Since every heating system has the same basic configuration with the same basic control requirements, a standardized control system can be used on every heating job as well.
The SLIC control is used to provide intelligent control for all three of the examples seen above. The same control box with identical hardware is used in every case, large and small, but with different software activated to match the heating equipment in each installation.
A program is available on the solarlogic.com website that we use to guide our design of these standardized primary loop piping systems. It is called the SLASH/D (SolarLogic Assisted Solar Heating Design) and anyone with a computer and a web browser is welcome to use it for free.
Final notes
These articles are targeted toward residential and small commercial buildings, typically smaller than 10,000 square feet. The focus is on pressurized glycol/hydronic systems since these systems can be applied in a wide variety of building geometries and orientations with few limitations. Brand names, organizations, suppliers and manufacturers are mentioned in these articles only to provide examples for illustration and discussion and do not constitute any recommendation or endorsement. Back issues of this column can be found in the archives at the PHCPPros and SolarLogic LLC websites.


